Introduction
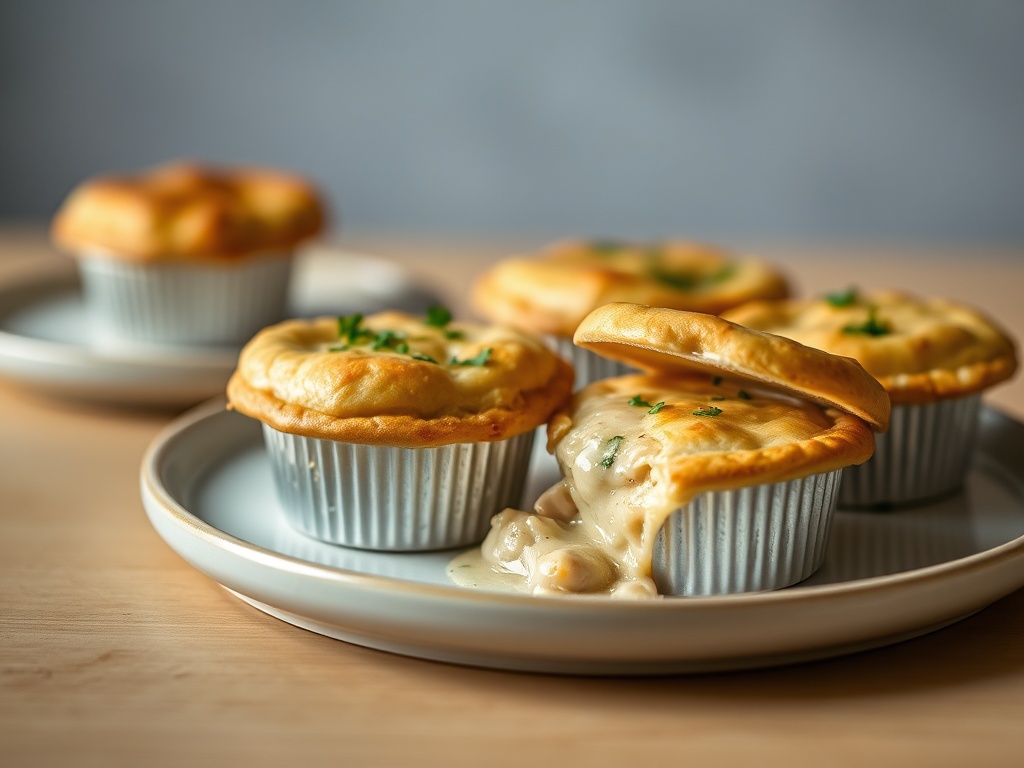
There’s something undeniably magical about a warm, savory chicken pot pie. It’s a dish that evokes memories of cozy evenings, family gatherings, and pure comfort. But what if you could capture all that deliciousness in a perfectly portioned, adorable package? Enter Mini Chicken Pot Pies – the ultimate comfort food, reimagined for modern convenience and undeniable charm. These little culinary gems take everything you love about the classic, creamy chicken and vegetable filling nestled under a flaky, golden crust, and shrink it down to a delightful, handheld size.
Why go mini? The advantages are endless! Mini pot pies offer effortless portion control, making them ideal for everything from elegant appetizers and party finger foods to a satisfying lunchbox treat or a light, yet hearty, dinner. Their individual size means faster baking times, so you can get that comforting aroma wafting through your kitchen sooner. Plus, let’s be honest, they’re incredibly cute and aesthetically pleasing, guaranteed to impress your guests or bring a smile to your family’s faces. They’re easier to serve and eat than their larger counterparts, eliminating the need for messy slicing and serving spoons. Each bite delivers that perfect ratio of rich filling to buttery crust, making them an instant crowd-pleaser.
The flavor profile of these mini wonders is exactly what you’d expect from a classic chicken pot pie: a velvety, savory sauce brimming with tender chicken and a medley of colorful vegetables, all encased in a perfectly flaky, golden-brown crust. It’s a symphony of textures and tastes that satisfies the soul. And the best part? This recipe is wonderfully versatile. Feel free to swap out vegetables, experiment with different proteins, or add your favorite herbs to make it uniquely yours. Get ready to bake up a batch of pure happiness – your kitchen is about to become the epicenter of comfort!
Nutritional Information
Per serving (approximate values for one mini pot pie):
- Calories: 320 kcal
- Protein: 18g
- Carbohydrates: 25g
- Fat: 16g
- Fiber: 3g
- Sodium: 550mg
Ingredients
- 2 refrigerated pie crusts (from a 14.1-ounce package), such as Pillsbury
- 1 tablespoon olive oil or butter
- 1 cup chopped yellow onion (about 1 small)
- 1 cup chopped carrots (about 2 medium)
- 1 cup chopped celery (about 2 stalks)
- 2 cloves garlic, minced
- 1/2 teaspoon dried thyme
- 1/4 teaspoon poultry seasoning (optional)
- 1/4 cup all-purpose flour
- 1 3/4 cups chicken broth, low sodium
- 1/2 cup whole milk or half-and-half
- 2 cups cooked chicken, shredded or diced (from a rotisserie chicken or leftover chicken breast/thighs)
- 1 cup frozen peas (no need to thaw)
- 1/2 teaspoon salt, or to taste
- 1/4 teaspoon black pepper, or to taste
- 1 large egg
- 1 tablespoon water or milk (for egg wash)
- Fresh parsley or chives, chopped (for garnish, optional)
Instructions
- Preheat your oven to 375°F (190°C). Lightly grease a standard 12-cup muffin tin.
- Unroll one refrigerated pie crust onto a lightly floured surface. Using a 3.5-inch round cookie cutter or the rim of a glass, cut out 6 circles. Carefully press each circle into a muffin cup, gently shaping it to fit the bottom and sides without tearing. Repeat with the second pie crust, yielding a total of 12 bottom crusts.
- Gather the scraps from both crusts, gently press them together, and roll out again to cut out 12 smaller circles (about 2.5-3 inches) for the top crusts. Alternatively, you can cut out decorative shapes or lattice strips if desired. Use a small knife to cut a few slits in the center of each top crust to allow steam to escape during baking. Set aside.
- In a large skillet or Dutch oven, heat the olive oil or butter over medium heat. Add the chopped onion, carrots, and celery. Cook, stirring occasionally, for 5-7 minutes, or until the vegetables are tender-crisp.
- Add the minced garlic, dried thyme, and poultry seasoning (if using) to the skillet. Cook for another minute until fragrant.
- Sprinkle the flour over the vegetables and stir well to coat. Cook for 1-2 minutes, stirring constantly, to cook out the raw flour taste and create a roux.
- Gradually whisk in the chicken broth, a little at a time, until smooth and no lumps remain. Then, gradually whisk in the milk or half-and-half. Bring the mixture to a gentle simmer, stirring frequently, and cook for 3-5 minutes, or until the sauce has thickened to your desired consistency. It should be thick enough to cling to the back of a spoon.
- Remove the skillet from the heat. Stir in the cooked shredded chicken, frozen peas, salt, and black pepper. Taste the filling and adjust seasonings as needed. It should be flavorful and well-balanced.
- Spoon approximately 1/4 to 1/3 cup of the chicken filling into each crust-lined muffin cup, being careful not to overfill.
- Place a reserved top crust over the filling in each muffin cup. Gently press the edges of the top crust onto the edges of the bottom crust to seal. You can crimp them with a fork for a decorative touch.
- In a small bowl, whisk together the egg and 1 tablespoon of water or milk to create an egg wash. Lightly brush the tops of each mini pot pie with the egg wash. This will give them a beautiful golden sheen.
- Bake for 20-25 minutes, or until the crusts are golden brown and the filling is bubbly. If the crusts begin to brown too quickly, you can loosely tent the muffin tin with aluminum foil.
- Carefully remove the muffin tin from the oven. Let the mini pot pies cool in the tin for 5-10 minutes before gently removing them with a knife or small spatula. This cooling time is crucial to allow the filling to set and prevent the pies from falling apart.
- Serve warm, garnished with fresh parsley or chives if desired. Enjoy your comforting, individual mini chicken pot pies!
Cooking Tips and Variations
For the flakiest crust, always work with cold pie dough. If your dough gets too warm and sticky, pop it back in the refrigerator for 10-15 minutes. When cutting out the crusts, use a sharp cutter and avoid twisting, as this can toughen the dough. Don’t be afraid to gently re-roll the scraps once or twice to get more crusts, but excessive re-rolling can lead to a tougher texture. The egg wash is more than just for looks; it helps seal the crust and creates that beautiful golden-brown finish.
The key to a successful filling is proper thickening. Make sure to cook the flour with the butter for a minute or two to eliminate any raw flour taste. When adding the liquids, do so gradually and whisk continuously to prevent lumps. The filling should be thick enough to hold its shape but still spoonable. Remember to taste and adjust the seasoning before you fill the pies – it’s much harder to do once they’re baked!
This recipe is incredibly versatile! For vegetable variations, consider adding diced mushrooms, spinach (sautéed and squeezed dry), broccoli florets, or even finely diced sweet potatoes for a touch of sweetness. If you’re not a fan of peas, corn is a great substitute, or simply omit them. For protein swaps, cooked turkey is a fantastic option, especially after holidays. Leftover shredded beef or even ham can also work. For a vegetarian version, replace the chicken with chickpeas, white beans, or a mix of extra hearty vegetables. A pinch of smoked paprika can add depth, or a touch of cayenne pepper if you like a little heat. For an extra layer of richness, sprinkle a tablespoon of shredded cheddar, Gruyere, or Parmesan cheese into the filling before topping with the crust. If you’re feeling ambitious, homemade pie crust will elevate these even further, or for a different texture, try using puff pastry or biscuit dough for the tops (or even both top and bottom).
Storage and Reheating
To store leftover mini chicken pot pies, allow them to cool completely to room temperature. Then, place them in an airtight container and refrigerate for up to 3-4 days. For reheating, you have a couple of options. To maintain a crispy crust, reheat them in a preheated oven or toaster oven at 300-325°F (150-160°C) for 10-15 minutes, or until heated through. If you’re short on time, they can also be reheated in the microwave, though the crust may lose some of its crispness. Microwave for 30-60 seconds per pie, or until warm. Be careful not to overheat, as this can make the filling rubbery.
These mini pot pies are also excellent for making ahead and freezing. To freeze unbaked pies, assemble them completely in the muffin tin, then place the entire tin in the freezer until the pies are solid. Once frozen, pop them out of the muffin tin and transfer them to a freezer-safe bag or container, separating layers with parchment paper to prevent sticking. They can be stored in the freezer for up to 2-3 months. When ready to bake, place the frozen pies back into a greased muffin tin (no need to thaw), brush with egg wash, and bake at 375°F (190°C) for 35-45 minutes, or until golden brown and bubbly. To freeze baked pies, allow them to cool completely, then wrap each pie individually in plastic wrap and then in foil, or place in a freezer-safe container. Freeze for up to 2-3 months. Reheat baked frozen pies in a preheated oven at 350°F (175°C) for 20-30 minutes, or until heated through.
Frequently Asked Questions
Can I use different vegetables in the filling?
Absolutely! The beauty of this recipe is its adaptability. Feel free to swap out the carrots, celery, and peas for your favorite vegetables. Diced potatoes, green beans, corn, mushrooms, or even a handful of fresh spinach (sautéed and squeezed dry before adding) would all be delicious additions. Just ensure any harder vegetables are diced small enough to cook through properly in the baking time.
Can I make these mini pot pies ahead of time?
Yes, these are fantastic for meal prep or making ahead! You can prepare the filling completely and store it in an airtight container in the refrigerator for up to 2 days. When you’re ready to bake, simply warm the filling slightly, assemble the pies, and bake as directed. Alternatively, you can assemble the entire pies (without the egg wash), cover them tightly with plastic wrap, and refrigerate for up to 24 hours before baking. Just add the egg wash right before they go into the oven.
What if I don’t have a muffin tin?
No problem! While a standard 12-cup muffin tin is ideal for these mini pot pies, you can definitely make them in other oven-safe dishes. Small ramekins (4-6 ounce capacity) or even small oven-safe bowls would work perfectly. You might get fewer but slightly larger pies, and the baking time may need to be adjusted slightly (likely a few minutes longer) depending on the size and depth of your chosen dishes. Just watch for golden-brown crusts and bubbly filling.
Can I use puff pastry instead of pie crust?
Yes, puff pastry is an excellent alternative for an incredibly flaky and buttery crust! You can use it for both the top and bottom crusts, or just for the top. If using for the bottom, you may need to press two layers together for more stability. If using for the top, simply cut out circles slightly larger than your muffin cups, place them over the filling, and crimp the edges. Puff pastry tends to puff up more dramatically, creating a beautiful domed top. The baking time and temperature should remain similar, but keep an eye on them as puff pastry can brown quickly.