Instructions
- Prepare the Cookie Mixture: In a large bowl, combine the crushed Nutter Butter cookies, peanut butter, powdered sugar, and 2 tablespoons of shortening.
- Mix Thoroughly: Use your hands or a sturdy spoon to mix the ingredients until they are well combined and form a cohesive dough. The mixture should be moist enough to hold together when pressed. If the mixture seems too dry, add a tablespoon of melted peanut butter or a teaspoon of milk at a time until the desired consistency is reached.
- Roll into Balls: Take a small amount of the mixture (about 1-inch in diameter) and roll it between your palms to form a smooth ball. Place the ball on a baking sheet lined with parchment paper or wax paper. Repeat with the remaining mixture.
- Chill the Balls: Place the baking sheet with the peanut butter balls in the refrigerator for at least 30 minutes. This will help the balls firm up and make them easier to dip in the chocolate.
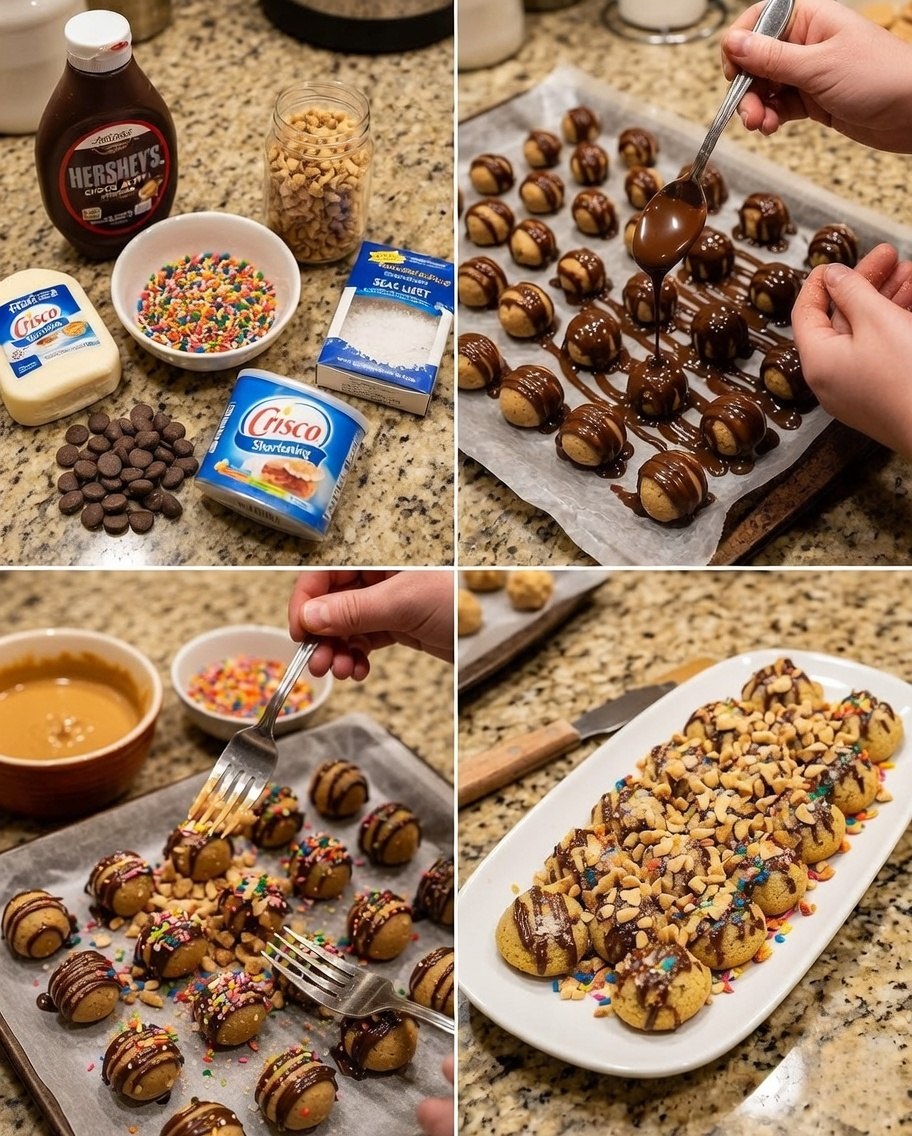
- Melt the Chocolate: While the balls are chilling, prepare the chocolate coating. In a heat-safe bowl, combine the chocolate chips and the remaining 2 tablespoons of shortening.
- Melt Chocolate (Double Boiler Method): Place the bowl over a simmering pot of water, making sure the bottom of the bowl does not touch the water. Stir frequently until the chocolate is completely melted and smooth.
- Melt Chocolate (Microwave Method): Alternatively, melt the chocolate and shortening in the microwave in 30-second intervals, stirring in between each interval, until the chocolate is completely melted and smooth. Be careful not to overheat the chocolate, as it can burn easily.
- Dip the Balls: Remove the peanut butter balls from the refrigerator. One at a time, carefully dip each ball into the melted chocolate, ensuring it is completely coated. You can use a fork or dipping tools to help with this process.
- Add Toppings: Immediately after dipping, place the chocolate-covered ball back on the parchment-lined baking sheet. Sprinkle with chopped peanuts and sprinkles while the chocolate is still wet.
- Drizzle with Chocolate Syrup (Optional): If desired, drizzle the peanut butter balls with chocolate syrup for an extra touch of sweetness and visual appeal.
- Chill to Set: Place the baking sheet back in the refrigerator and chill for at least 30 minutes, or until the chocolate is completely set.
- Serve and Enjoy: Once the chocolate is set, remove the Nutter Butter Peanut Butter Balls from the refrigerator and arrange them on a serving platter. Serve and enjoy!
Cooking Tips and Variations
Here are some tips to ensure your Nutter Butter Peanut Butter Balls turn out perfectly every time:
- Use Room Temperature Peanut Butter: Room temperature peanut butter is easier to mix with the other ingredients, resulting in a smoother dough.
- Chill the Mixture Before Rolling: If the dough is too soft, chilling it for 15-20 minutes before rolling can help prevent sticking and make the balls easier to shape.
- Melt Chocolate Slowly: Melting chocolate slowly and evenly is crucial to avoid burning or seizing. Whether you use a double boiler or the microwave, be patient and stir frequently. Adding a small amount of shortening or coconut oil to the chocolate can help create a smoother, more drizzle-friendly consistency.
- Work Quickly When Adding Toppings: The chocolate sets relatively quickly, so it’s important to add your toppings (peanuts, sprinkles, etc.) immediately after dipping each ball. This will ensure that the toppings adhere properly.
- Don’t Overheat the Chocolate: Overheated chocolate can become grainy or seize up. If using the microwave, melt the chocolate in short intervals, stirring in between, until just melted.
- Use a Cookie Scoop: For uniform sized balls, use a small cookie scoop to portion out the mixture.
Here are some fun variations you can try to customize your Nutter Butter Peanut Butter Balls:
- Different Types of Chocolate: Use white chocolate, dark chocolate, or even peanut butter chips instead of semi-sweet chocolate for a different flavor profile.
- Add Sea Salt: A pinch of sea salt in the peanut butter mixture or sprinkled on top of the chocolate can enhance the sweetness and create a delicious salty-sweet combination.
- Roll in Cocoa Powder or Crushed Cookies: Instead of nuts or sprinkles, roll the peanut butter balls in cocoa powder, crushed Nutter Butter cookies, or even crushed pretzels for a unique texture and flavor.
- Add Rice Krispies or Other Cereals: For added crunch, mix in a handful of Rice Krispies, crushed cornflakes, or other cereals into the peanut butter mixture.
- Add Mini Chocolate Chips: Mix mini chocolate chips into the peanut butter mixture for extra chocolatey goodness.
- Use Different Nut Butters: Try using almond butter, cashew butter, or sunflower seed butter instead of peanut butter for a different flavor.
- Stuffed Peanut Butter Balls: Before rolling, press a small piece of a peanut butter cup or a caramel into the center of each ball for a surprise filling.
- Make Them Festive: Use holiday-themed sprinkles or colored chocolate melts to make these balls perfect for any occasion.
Storage and Reheating
To maintain freshness, store your Nutter Butter Peanut Butter Balls in an airtight container in the refrigerator. They will keep for up to 1 week. The cool temperature helps to keep the chocolate firm and the peanut butter from getting too soft.
These peanut butter balls are best enjoyed cold or at room temperature. If they have been refrigerated, you can let them sit at room temperature for a few minutes before serving to soften them slightly. Reheating is not recommended, as it can cause the chocolate to melt and the balls to lose their shape and texture.
Frequently Asked Questions
Can I use natural peanut butter?
While you can use natural peanut butter, keep in mind that it tends to be oilier than processed peanut butter. If using natural peanut butter, make sure to stir it well before measuring and you may need to add a bit more powdered sugar to achieve the right consistency.
Can I freeze these peanut butter balls?
Yes, you can freeze Nutter Butter Peanut Butter Balls! Place them in a single layer on a baking sheet lined with parchment paper and freeze for about 30 minutes, or until solid. Then, transfer them to an airtight container or freezer bag and store in the freezer for up to 2 months. When ready to serve, thaw them in the refrigerator overnight or at room temperature for a few hours.
Can I make these ahead of time?
Absolutely! In fact, making them a day or two in advance is a great idea, as it allows the flavors to meld together and the chocolate to set completely. Just store them in an airtight container in the refrigerator until ready to serve.
What if my chocolate seizes when melting?
If your chocolate seizes (becomes thick and grainy) while melting, try adding a teaspoon of vegetable oil or shortening and stirring vigorously. Sometimes, this can help to bring the chocolate back to a smooth consistency. However, it’s best to avoid seizing in the first place by melting the chocolate slowly and evenly and avoiding any contact with water.