Introduction
There are very few sounds as universally satisfying in the kitchen as the gentle sizzle of fresh okra hitting hot oil, promising a golden, crispy coating and a tender, savory interior. Fried okra is more than just a side dish; it’s a quintessential taste of Southern comfort, a culinary hug that evokes images of summer gatherings, backyard BBQs, and potlucks brimming with good food and even better company. Its irresistible crunch and subtly sweet, earthy flavor make it a beloved staple, transforming a humble garden vegetable into a star on any plate.
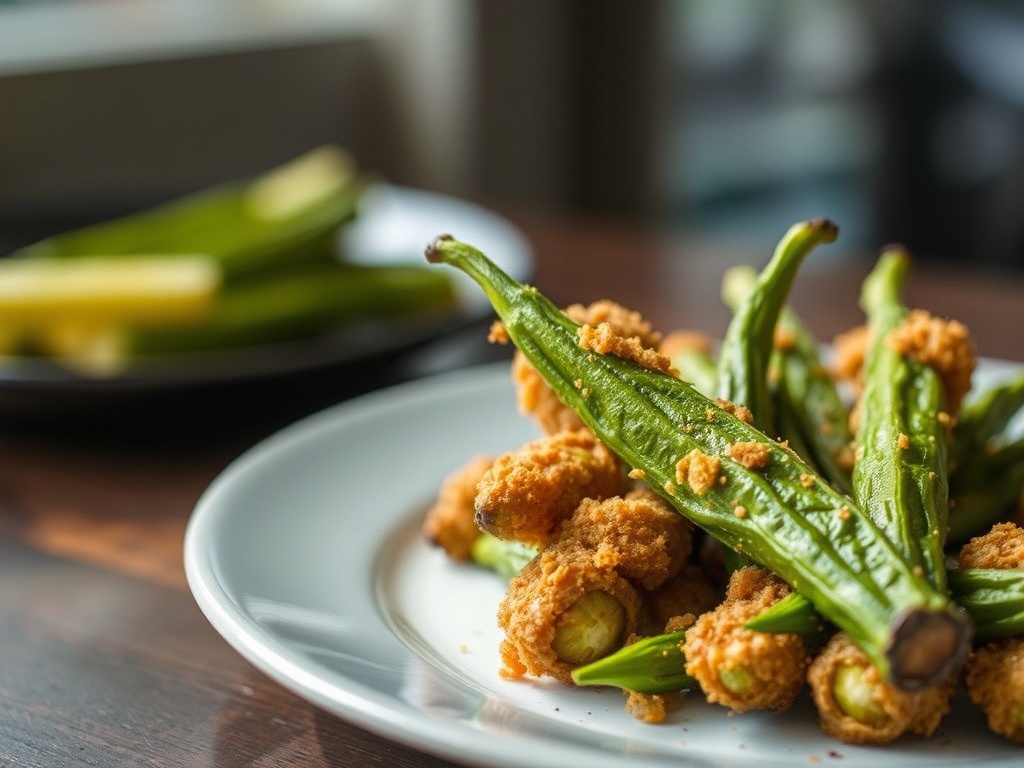
While some might shy away from okra due to its notorious “slimy” reputation, this recipe completely sidesteps that issue, delivering perfectly crispy morsels every single time. The secret lies in a careful preparation and a classic Southern dredging technique that locks in flavor and ensures a delightful texture. Our recipe guides you through creating fried okra that boasts an exquisitely seasoned, crunchy crust while maintaining a soft, flavorful core, proving that quick, simple steps can lead to truly spectacular results. Get ready to experience fried okra at its absolute best!
Nutritional Information
Per serving (approximate values):
- Calories: 320
- Protein: 8g
- Carbohydrates: 35g
- Fat: 18g
- Fiber: 6g
- Sodium: 550mg
Ingredients
- 1 lb fresh okra, rinsed, patted thoroughly dry, ends trimmed, and sliced into 1/2-inch rounds
- 1 cup all-purpose flour
- 1/2 cup fine or medium-grind cornmeal
- 1 teaspoon salt, plus more for seasoning after frying
- 1/2 teaspoon black pepper
- 1/4 teaspoon cayenne pepper (optional, for a kick)
- 1/2 teaspoon garlic powder (optional)
- 1 cup buttermilk (or 1 cup milk + 1 tablespoon lemon juice or white vinegar, let sit 5-10 minutes)
- 4-6 cups vegetable oil, peanut oil, or canola oil, for frying
Instructions
- Prepare the Okra: Ensure the fresh okra is thoroughly rinsed under cold water and then patted completely dry with paper towels. This step is crucial for the breading to adhere properly. Trim off the stem ends and slice the okra into 1/2-inch thick rounds. Set aside.
- Set Up Dredging Station: Prepare two shallow bowls. In the first bowl, pour the buttermilk. In the second bowl, whisk together the all-purpose flour, cornmeal, 1 teaspoon salt, 1/2 teaspoon black pepper, cayenne pepper (if using), and garlic powder (if using) until well combined.
- Dredge the Okra: Working in small batches, add a handful of sliced okra to the buttermilk, ensuring each piece is coated. Lift the okra from the buttermilk, allowing any excess to drip off, then transfer it to the dry flour and cornmeal mixture. Toss gently to coat thoroughly, making sure every piece is covered. Shake off any excess breading. Place the breaded okra on a clean plate or baking sheet in a single layer, ensuring not to overcrowd. Repeat with the remaining okra.
- Heat the Oil: Pour the frying oil into a heavy-bottomed pot or Dutch oven, ensuring it’s about 2-3 inches deep. Heat the oil over medium-high heat until it reaches a temperature of 350-375°F (175-190°C). If you don’t have a thermometer, you can test the oil by dropping a small pinch of the dry breading mixture into it. If it sizzles vigorously and turns golden brown within 30-60 seconds, the oil is ready.
- Fry the Okra: Carefully add the breaded okra to the hot oil in small batches. Do not overcrowd the pot, as this will lower the oil temperature and result in greasy, soggy okra. Fry for 3-5 minutes, turning occasionally with a slotted spoon or spider, until the okra is golden brown and crispy.
- Drain and Season: Once fried to perfection, use a slotted spoon or spider to transfer the crispy okra to a paper towel-lined plate or baking sheet to drain any excess oil. Immediately sprinkle with additional salt to taste while it’s still hot.
- Serve Immediately: Serve the fried okra hot as a delicious side dish.
Cooking Tips and Variations
To achieve the crispiest fried okra, ensure your fresh okra is absolutely dry before slicing; moisture is the enemy of crispiness. After breading the okra, letting it sit for 5-10 minutes before frying allows the coating to adhere better, reducing the chance of it falling off in the hot oil. Maintaining a consistent oil temperature between 350-375°F (175-190°C) is paramount; an oil thermometer is an invaluable tool for this. Too low, and your okra will be greasy; too high, and it will burn on the outside before cooking through.
For a spicier kick, boost the amount of cayenne pepper in the breading mixture, or even add a pinch of chili powder. If you’re looking to infuse herbal notes, dried thyme, oregano, or a touch of smoked paprika can be wonderful additions to the flour and cornmeal blend. For those with dietary restrictions, this recipe can easily be adapted to be gluten-free by using a certified gluten-free all-purpose flour blend and ensuring your cornmeal is also certified GF. While traditionally deep-fried, you can achieve a healthier version by tossing the breaded okra with a tablespoon or two of oil and baking it in a single layer at 400°F (200°C) for 15-20 minutes, flipping halfway, or air frying at 375°F (190°C) for 10-15 minutes until golden and crispy.
Storage and Reheating
Fried okra is undoubtedly best enjoyed immediately after it’s cooked, when its crispy exterior is at its peak. As it sits, the moisture from the okra can soften the breading. If you do have leftovers, allow them to cool completely before transferring them to an airtight container. Store in the refrigerator for up to 2-3 days.
To reheat fried okra and best revive its crispiness, avoid the microwave, which will only make it soggy. Instead, spread the okra in a single layer on a baking sheet and reheat in a preheated oven at 375°F (190°C) for about 8-12 minutes, or until heated through and re-crisped. An air fryer is also an excellent option for reheating; simply arrange the okra in a single layer in the air fryer basket and cook at 350°F (175°C) for 5-7 minutes, shaking the basket halfway through, until hot and crispy again. Freezing fried okra is generally not recommended as it will significantly compromise the texture upon thawing and reheating.
Frequently Asked Questions
Why does my fried okra turn out slimy?
The primary reason for slimy fried okra is often insufficient drying of the fresh okra before slicing and breading. Ensure you pat the okra thoroughly dry with paper towels. The buttermilk coating in this recipe also helps to minimize sliminess by creating a barrier and contributing to a quick, high-heat fry, which is key to preventing the mucilage from becoming prominent.
How do I prevent my fried okra from being greasy?
Greasy fried okra is usually a sign that your oil temperature was too low. When the oil isn’t hot enough, the breading absorbs more oil instead of quickly cooking to a crisp. Always ensure your oil is within the ideal range of 350-375°F (175-190°C) and avoid overcrowding the pot, which can cause the oil temperature to drop significantly.
What kind of oil is best for frying okra?
For frying okra, it’s best to use oils with a high smoke point and neutral flavor. Vegetable oil, peanut oil, and canola oil are all excellent choices. These oils can withstand the high temperatures required for frying without breaking down or imparting undesirable flavors to your food.
Can I make fried okra ahead of time?
While you can prepare the okra by slicing and breading it a little ahead of time (letting it sit for 5-10 minutes helps the coating adhere), fried okra is truly best enjoyed fresh from the oil. The longer it sits, especially after being cooked, the more the crispy coating will soften. We recommend frying it just before you plan to serve it for the optimal taste and texture experience.