Introduction
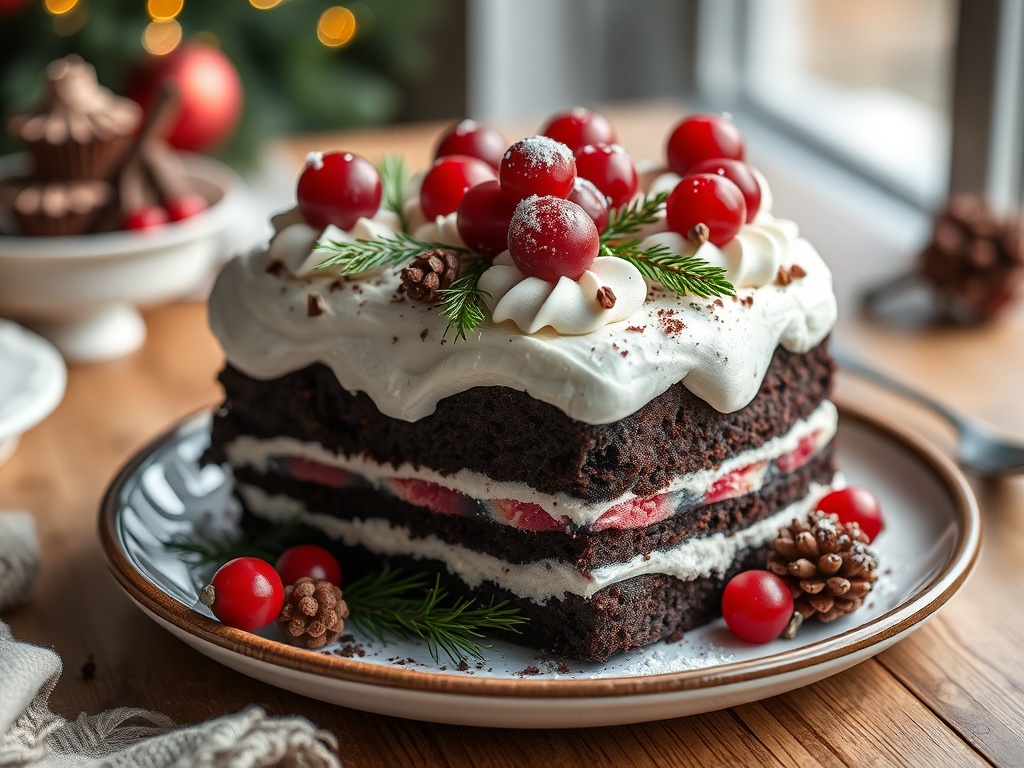
As the festive season twinkles into full swing, there’s one dessert that consistently steals the spotlight on holiday tables: the majestic Christmas Black Forest Cake. This isn’t just any cake; it’s a decadent symphony of flavors and textures, a true showstopper that embodies the spirit of indulgence and celebration. Imagine layers of rich, moist chocolate sponge, infused with the subtle warmth of Kirsch, embracing a luscious filling of tart cherries, all enrobed in billows of fresh, lightly sweetened whipped cream. Adorned with elegant chocolate shavings and vibrant fresh cherries, it’s a visual masterpiece that promises an unforgettable culinary experience, making it the quintessential centerpiece for your Christmas feast.
The Black Forest cake, or Schwarzwälder Kirschtorte as it’s known in its native Germany, boasts a rich heritage, originating from the Black Forest region where kirschwasser (cherry brandy) is a local specialty. Over the decades, this classic dessert has transcended its German roots to become a beloved global phenomenon, particularly cherished during the Christmas season. Our rendition respects this esteemed tradition while infusing it with a special festive touch, ensuring each slice not only delivers authentic flavors but also captures the joyous essence of the holidays. This recipe balances the timeless appeal of the original with a presentation perfectly suited for your most cherished Christmas gatherings.
Prepare to embark on a delightful baking journey that promises impressive results without overwhelming complexity. We’ve meticulously crafted this recipe to be detailed and straightforward, guiding you through each step from preparing the velvety chocolate sponge to assembling the grand finale. Whether you’re a seasoned baker or a holiday enthusiast eager to create a memorable dessert, this Christmas Black Forest Cake recipe will equip you with all the knowledge and tips to bake a truly spectacular treat. Get ready to impress your loved ones with a dessert that is as rich in history as it is in flavor, making it a cherished new tradition for your holiday celebrations.
Nutritional Information
Per serving (approximate values):
- Calories: 550kcal
- Protein: 7g
- Carbohydrates: 65g
- Fat: 30g
- Fiber: 3g
- Sodium: 250mg
Ingredients
For the Chocolate Sponge Cakes:
- 1 ½ cups (190g) all-purpose flour
- 1 cup (90g) unsweetened cocoa powder, high-quality
- 1 ½ teaspoons baking soda
- ¾ teaspoon baking powder
- ¾ teaspoon salt
- 1 ½ cups (300g) granulated sugar
- ¾ cup (180ml) vegetable oil
- ¾ cup (180ml) buttermilk
- 2 large eggs, at room temperature
- 1 teaspoon vanilla extract
- ¾ cup (180ml) hot brewed coffee (or hot water)
For the Cherry Filling:
- 2 cans (15 ounces each) pitted sour cherries, drained (reserve ½ cup of juice)
- ½ cup (100g) granulated sugar
- 2 tablespoons cornstarch
- ¼ cup (60ml) Kirschwasser (cherry brandy), optional
For the Kirsch Syrup (Optional, for soaking cakes):
- ¼ cup (60ml) reserved cherry juice
- 2 tablespoons Kirschwasser (cherry brandy)
For the Whipped Cream Frosting:
- 4 cups (960ml) heavy cream (at least 36% fat), very cold
- ½ cup (60g) powdered sugar, sifted
- 2 teaspoons vanilla extract
- 1 teaspoon unflavored gelatin powder (for stabilized cream, optional)
- 2 tablespoons cold water (for stabilized cream, optional)
For Garnish:
- 1 cup (100g) chocolate shavings or curls
- 12-15 fresh cherries with stems, or maraschino cherries
- A dusting of unsweetened cocoa powder
Instructions
A. Preparing the Chocolate Sponge Cakes:
- Preheat your oven to 350°F (175°C). Grease and flour two 8-inch round cake pans, or line the bottoms with parchment paper and grease the sides.
- In a large bowl, whisk together the all-purpose flour, cocoa powder, baking soda, baking powder, and salt. Sifting these dry ingredients is recommended to prevent lumps and aerate the flour.
- In a separate medium bowl, whisk together the granulated sugar, vegetable oil, buttermilk, eggs, and vanilla extract until well combined.
- Gradually add the wet ingredients to the dry ingredients, mixing on low speed with an electric mixer or by hand until just combined. Be careful not to overmix the batter, as this can make the cake tough.
- Slowly pour in the hot brewed coffee (or hot water) and mix until the batter is smooth. The batter will be thin.
- Divide the batter evenly between the two prepared cake pans. Evenly divided batter ensures uniform layers.
- Bake for 30-35 minutes, or until a wooden skewer inserted into the center of the cakes comes out clean.
- Remove the cakes from the oven and let them cool in the pans for 10-15 minutes before inverting them onto a wire rack to cool completely. Cooling cakes completely before assembling prevents the whipped cream from melting.
B. Creating the Luscious Cherry Filling:
- In a medium saucepan, combine the drained sour cherries, ½ cup reserved cherry juice, and granulated sugar.
- In a small bowl, whisk the cornstarch with 2 tablespoons of cold water to create a slurry.
- Bring the cherry mixture to a simmer over medium heat, stirring occasionally.
- Once simmering, slowly whisk in the cornstarch slurry. Continue to cook, stirring constantly, until the mixture thickens to a jam-like consistency, about 2-3 minutes.
- Remove from heat and let cool. If using, stir in the Kirschwasser. Adjust Kirsch to taste, or omit for a family-friendly version.
- Transfer the cherry filling to a bowl and refrigerate until completely chilled and set, at least 1 hour.
C. Whipping the Dreamy Cream:
- If stabilizing the whipped cream: In a small microwave-safe bowl, sprinkle the gelatin powder over 2 tablespoons of cold water. Let it sit for 5 minutes to bloom. Microwave for 10-15 seconds, or until the gelatin is fully dissolved and clear. Let it cool slightly (but not set).
- Ensure your heavy cream, mixing bowl, and whisk attachment are very cold. Chill your bowl and whisk for faster, firmer whipped cream.
- Pour the cold heavy cream into the chilled mixing bowl. Add the powdered sugar and vanilla extract.
- Begin whipping on medium speed, gradually increasing to high speed.
- If using stabilized cream, once the cream starts to thicken (soft peaks form), slowly drizzle in the cooled dissolved gelatin while continuing to whip.
- Continue whipping until stiff peaks form. Be careful not to over-whip, or it will turn grainy and potentially separate.
D. Assembling the Christmas Showstopper:
- Once the cake layers are completely cool, use a serrated knife or a cake leveler to level the tops of the cakes, creating flat surfaces.
- If using the Kirsch Syrup: In a small bowl, combine ¼ cup reserved cherry juice and 2 tablespoons Kirschwasser. Lightly brush the top of each cake layer with this syrup. This helps keep the layers moist and adds flavor.
- Place one cake layer on your serving plate or cake stand.
- Spread about 1 ½ cups of whipped cream evenly over the first cake layer, leaving a small border around the edge.
- Spoon half of the chilled cherry filling over the whipped cream, spreading it gently.
- Carefully place the second cake layer on top of the cherry filling.
- Spread another 1 ½ cups of whipped cream over the second cake layer, followed by the remaining cherry filling.
- Place the third cake layer (if using 3 layers, otherwise proceed to the next step) on top.
- Apply a thin crumb coat of whipped cream all over the cake to seal in any loose crumbs. Chill the cake in the refrigerator for 15-20 minutes to set the crumb coat. This step is crucial for a neat final frosting.
- Once the crumb coat is set, apply the remaining whipped cream to the top and sides of the cake, using an offset spatula to smooth it out.
E. The Grand Finale: Garnishing for the Holidays:
- Press chocolate shavings or curls onto the sides of the cake, or sprinkle them generously over the top.
- Arrange fresh cherries (or maraschino cherries) decoratively on top of the cake.
- For a festive touch, dust the top of the cake lightly with unsweetened cocoa powder using a small sifter.
- Refrigerate the cake for at least 1-2 hours before serving to allow the flavors to meld and the cream to set firmly.
Cooking Tips and Variations
For the deepest chocolate flavor in your sponge, always opt for high-quality unsweetened cocoa powder. Dutch-processed cocoa will give a darker color and milder chocolate taste, while natural cocoa offers a more intense, slightly acidic chocolate flavor that reacts well with baking soda. To ensure your cake layers are tender, avoid overmixing the batter once the wet and dry ingredients are combined; mix only until just incorporated. Using hot coffee instead of hot water in the batter enhances the chocolate flavor without making the cake taste like coffee.
When preparing the cherry filling, sour cherries are preferred for their tartness, which beautifully contrasts the sweetness of the cake and cream. If fresh sour cherries are unavailable, good quality canned sour cherries (packed in water or light syrup) work perfectly. For a non-alcoholic version, you can substitute the Kirschwasser in the cherry filling and syrup with an equal amount of cherry juice or a combination of cherry juice and a touch of almond extract for depth. To ensure your whipped cream holds its shape, especially for a taller cake, ensure your heavy cream has at least 36% fat content, and always chill your mixing bowl and whisk attachment in the freezer for 15-20 minutes before whipping. This helps the cream whip faster and achieve a more stable consistency. For extra stability, the optional addition of gelatin, as outlined in the instructions, is a baker’s secret for a long-lasting, firm whipped cream that won’t weep.
For a festive twist, consider adding a pinch of cinnamon or nutmeg to your chocolate sponge batter, which complements the cherry and chocolate flavors beautifully and adds a warm, holiday spice note. Instead of just chocolate shavings, you could use white chocolate curls for a “snowy” effect, or even add edible glitter for extra sparkle. For a quick and easy garnish, chocolate curls can be made by gently scraping the back of a large knife or a vegetable peeler across a block of room-temperature chocolate. If you’re short on time, pre-made chocolate curls or chips can be a convenient substitute. Always remember to cool your cake layers completely before assembling; warm cakes will melt the whipped cream and lead to a messy, unstable cake. This is a crucial step for a professional-looking finish.
Storage and Reheating
To preserve the freshness and structural integrity of your Christmas Black Forest Cake, proper storage is essential. Once assembled, the cake should be stored in an airtight cake carrier or covered loosely with plastic wrap in the refrigerator. This will keep the whipped cream firm and prevent the cake layers from drying out. When stored correctly, the cake will remain fresh and delicious for up to 3-4 days. It is not recommended to freeze the assembled cake due to the whipped cream frosting, which can change texture upon thawing. However, the baked and cooled chocolate sponge layers can be individually wrapped tightly in plastic wrap and then aluminum foil and frozen for up to 1 month. Thaw them at room temperature before assembling.
For the best flavor and texture, it is advisable to allow the cake to sit at room temperature for about 15-20 minutes before serving. This allows the cake layers to soften slightly and the flavors to meld and become more pronounced, enhancing the overall eating experience. Serving the cake directly from the refrigerator might make the sponge a bit firm and the cream too cold to fully appreciate its richness. When slicing the cake, use a sharp, thin-bladed knife that has been run under hot water and wiped clean between each cut. This technique ensures clean, neat slices, especially through the delicate layers of cream and cake.
Frequently Asked Questions
What is Kirschwasser and can I omit it?
Kirschwasser, often simply called Kirsch, is a clear, colorless brandy made from double-distilled sour cherries, including their pits. It’s a traditional ingredient in Black Forest cake, lending a distinctive fruity aroma and subtle almond notes. While it significantly contributes to the authentic flavor, you can certainly omit it for an alcohol-free version. Substitute the Kirschwasser in the cherry filling with extra cherry juice or a teaspoon of almond extract. For soaking the cake layers, use a simple syrup (equal parts sugar and water, simmered until dissolved and cooled) mixed with cherry juice.
Can I make parts of the cake ahead of time?
Yes, absolutely! Black Forest cake is an excellent make-ahead dessert. The chocolate cake layers can be baked up to 2-3 days in advance, wrapped tightly in plastic wrap, and stored at room temperature, or frozen for up to a month. The cherry filling can be prepared 1-2 days ahead and stored in an airtight container in the refrigerator. The whipped cream, however, is best made fresh on the day of assembly or no more than a few hours beforehand, especially if not stabilized. If using stabilized whipped cream, it can be made the day before. Assembling the cake no more than 24 hours before serving ensures optimal freshness and appearance.
Why did my whipped cream become grainy or not hold its shape?
There are a few common reasons for whipped cream issues. Grainy whipped cream usually means it was over-whipped; once stiff peaks form, stop immediately. If your cream didn’t hold its shape, it might not have been cold enough, or it didn’t have a high enough fat content (always use heavy cream with at least 36% fat). Ensure your bowl and whisk are thoroughly chilled before starting. If you’re struggling with stability, incorporating the optional gelatin or using a commercial whipped cream stabilizer can make a significant difference, especially for a cake that needs to hold up for a longer period.