Instructions
- Preheat the oven: Preheat your oven to 400°F (200°C).
- Prepare the zucchini: Wash the zucchini thoroughly. Trim off the ends. Slice the zucchini into thick rounds, about 1/2 to 3/4 inch thick. These are your “zucchini steaks.”
- Draw out excess moisture (optional): For less soggy zucchini, place the zucchini steaks in a colander. Sprinkle them with 1/2 teaspoon of salt. Let them sit for 10-15 minutes. This will draw out excess moisture. Pat the zucchini steaks dry with paper towels before proceeding. This step is highly recommended.
- Prepare the garlic mixture: In a small bowl, combine the olive oil, minced garlic, salt, and pepper. Mix well.
- Brush the zucchini: Arrange the zucchini steaks on a baking sheet lined with parchment paper. Brush each zucchini steak with the garlic oil mixture, ensuring both sides are coated evenly.
- Bake: Bake the zucchini steaks in the preheated oven for 12-15 minutes, or until they are slightly tender.
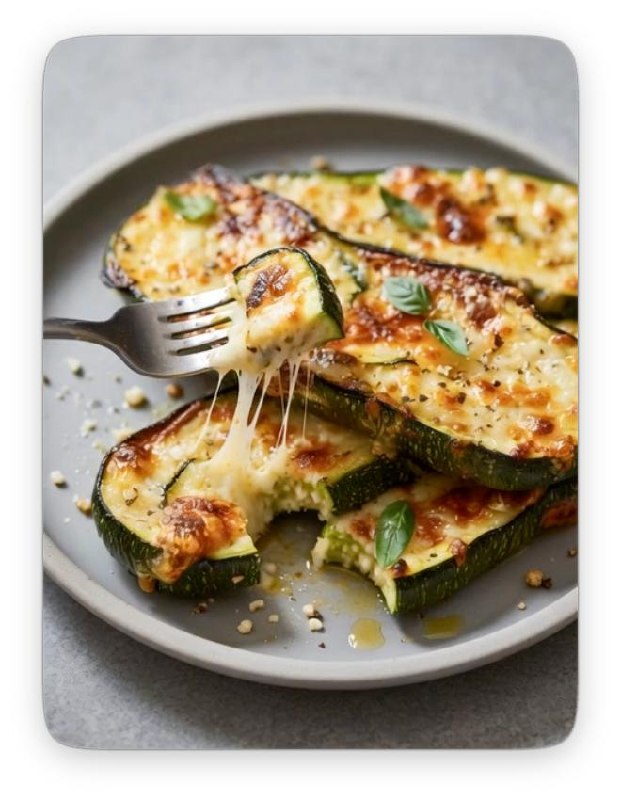
- Add the cheese: Remove the baking sheet from the oven. Sprinkle each zucchini steak with a generous amount of mozzarella cheese and a sprinkle of Parmesan cheese.
- Broil (optional): If desired, broil the zucchini steaks for 1-2 minutes, or until the cheese is melted, bubbly, and lightly browned. Watch carefully to prevent burning.
- Garnish and serve: Remove the zucchini steaks from the oven and let them cool for a minute or two. Garnish with fresh chopped basil. Serve immediately.
Cooking Tips and Variations
- Preventing Soggy Zucchini: The key to avoiding soggy zucchini steaks is to remove excess moisture. Salting the zucchini and patting it dry before cooking is crucial. Don’t skip this step! Also, make sure your oven is hot enough to encourage caramelization rather than steaming.
- Cheese Browning: For a beautifully browned and bubbly cheese topping, broil the zucchini steaks for the last minute or two of cooking. Keep a close eye on them to prevent burning.
- Garlic Flavor: If you prefer a more subtle garlic flavor, you can use garlic powder instead of fresh minced garlic. Alternatively, you can sauté the minced garlic in the olive oil for a minute or two before brushing it on the zucchini to mellow out its intensity.
- Even Cooking: To ensure even cooking, choose zucchini that are similar in size and shape. Slice the zucchini into uniform thickness.
- Cheese Options: Feel free to experiment with different cheeses. Provolone, fontina, Gruyere, or a blend of Italian cheeses would all be delicious. You could also add a sprinkle of crumbled feta cheese for a salty, tangy flavor.
- Herb and Spice Variations: Get creative with your herbs and spices! Add a pinch of red pepper flakes for a little heat, or sprinkle on some dried oregano, thyme, or rosemary for an earthy flavor. A squeeze of lemon juice after baking can also brighten up the dish.
- Adding Breadcrumbs: For a crispy topping, mix some breadcrumbs (panko breadcrumbs work well) with the cheese before sprinkling it on the zucchini.
- Sautéing Before Baking: For a richer flavor and softer texture, sauté the zucchini steaks in the garlic oil mixture for a few minutes before baking. This will help them caramelize and develop a deeper flavor.
- Serving Temperature: These zucchini steaks are best served warm, when the cheese is still melted and gooey.
- Grilling Option: During the summer, you can also grill the zucchini steaks. Brush them with the garlic oil mixture and grill over medium heat for 3-4 minutes per side, or until tender and slightly charred. Then, top with cheese and grill for another minute or two until melted.
Storage and Reheating
Storage: Leftover Cheesy Garlic Zucchini Steaks can be stored in an airtight container in the refrigerator for up to 3 days. Keep in mind that the zucchini may release some moisture as it sits, so the texture might be slightly softer upon reheating.
Reheating: To reheat, you have several options:
- Oven: Preheat your oven to 350°F (175°C). Place the zucchini steaks on a baking sheet and bake for 5-10 minutes, or until heated through and the cheese is melted again.
- Microwave: This is the quickest option, but the zucchini may become a bit soggy. Microwave on high for 1-2 minutes, or until heated through.
- Skillet: Heat a lightly oiled skillet over medium heat. Place the zucchini steaks in the skillet and cook for 2-3 minutes per side, or until heated through and the cheese is melted. This method can help restore some of the crispness.
- Air Fryer: Preheat your air fryer to 350°F (175°C). Place the zucchini steaks in the air fryer basket and cook for 3-5 minutes, or until heated through and the cheese is melted. This method helps to maintain a good texture.
It’s best to consume the reheated zucchini steaks as soon as possible for the best texture and flavor.
Frequently Asked Questions
Can I use different types of cheese?
Absolutely! Feel free to experiment with your favorite cheeses. Provolone, fontina, Gruyere, mozzarella, or a blend of Italian cheeses would all work well. You can also add a sprinkle of crumbled feta cheese for a salty, tangy flavor. Consider a sharp cheddar for a bolder taste.
How do I prevent the zucchini from getting soggy?
The key to preventing soggy zucchini is to remove excess moisture before cooking. Salting the zucchini slices and letting them sit for 10-15 minutes draws out the moisture. Pat them dry with paper towels before proceeding with the recipe. Also, ensure your oven is hot enough to promote caramelization rather than steaming.
Can I make this recipe ahead of time?
You can prepare the zucchini steaks up to the point of adding the cheese ahead of time. Store the prepared zucchini steaks in an airtight container in the refrigerator. When you’re ready to bake, simply add the cheese and bake as directed. This is a great way to save time on a busy weeknight.
Is this recipe gluten-free?
Yes, this recipe is naturally gluten-free as long as you are not using breadcrumbs, which is an optional ingredient. Be sure to check the labels of any cheese you use to ensure it doesn’t contain any gluten-containing additives.