Instructions
- Make the Vanilla Cupcakes:
- Preheat oven to 350°F (175°C). Line a 12-cup muffin tin with cupcake liners.
- In a medium bowl, whisk together the flour, baking powder, and salt.
- In a large bowl, cream together the softened butter and sugar until light and fluffy.
- Beat in the eggs one at a time, then stir in the vanilla extract.
- Gradually add the dry ingredients to the wet ingredients, alternating with the milk, beginning and ending with the dry ingredients. Mix until just combined. Do not overmix.
- Fill each cupcake liner about ⅔ full.
- Bake for 18-20 minutes, or until a wooden skewer inserted into the center comes out clean. The cupcakes should be golden brown.
- Let the cupcakes cool in the tin for a few minutes before transferring them to a wire rack to cool completely.
- Make the Custard Filling:
- In a medium saucepan, whisk together the milk, sugar, cornstarch, and salt.
- In a separate bowl, whisk the egg yolks.
- Slowly pour about ½ cup of the milk mixture into the egg yolks, whisking constantly to temper the eggs and prevent them from curdling.
- Pour the egg yolk mixture back into the saucepan with the remaining milk mixture.
- Cook over medium heat, stirring constantly with a whisk, until the custard thickens and comes to a simmer. This should take about 5-7 minutes.
- Remove from heat and stir in the butter and vanilla extract.
- Pour the custard into a bowl, press a piece of plastic wrap directly onto the surface to prevent a skin from forming, and refrigerate for at least 2 hours, or until completely cooled and thickened.
- Make the Chocolate Ganache:
- Place the finely chopped chocolate in a heatproof bowl.
- In a small saucepan, heat the heavy cream over medium heat until it just begins to simmer. Do not boil.
- Pour the hot cream over the chocolate and let it sit for 1 minute to soften the chocolate.
- Gently stir the mixture, starting from the center and working your way outwards, until the chocolate is completely melted and the ganache is smooth and glossy.
- Stir in the butter.
- Let the ganache cool slightly, about 10-15 minutes, so it thickens enough to coat the cupcakes. If it gets too thick, you can gently warm it in the microwave for a few seconds at a time.
- Assemble the Cupcakes:
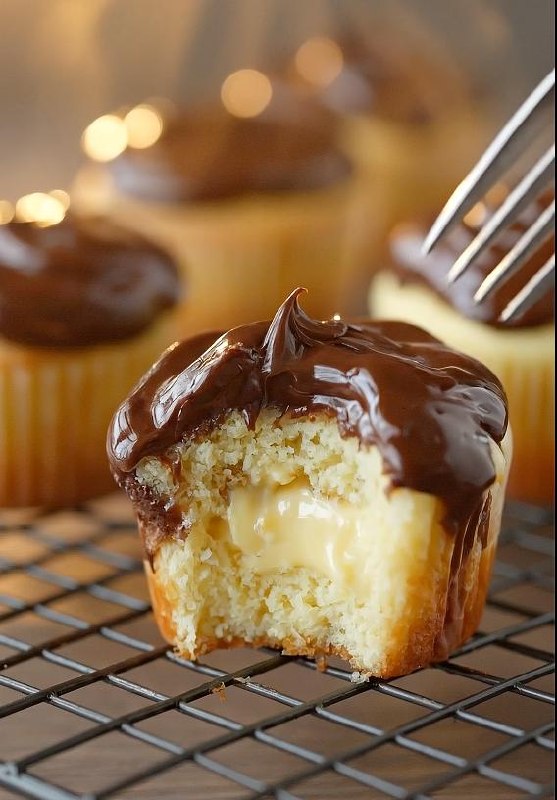
- Once the cupcakes are completely cooled, use a small knife or a cupcake corer to remove a small portion from the center of each cupcake, creating a well for the custard filling.
- Transfer the cooled custard to a piping bag fitted with a round tip.
- Pipe the custard filling into the center of each cupcake.
- Dip the top of each cupcake into the chocolate ganache, allowing the excess to drip off. Alternatively, you can pour the ganache over the tops of the cupcakes.
- Let the ganache set completely before serving. This will take about 30 minutes at room temperature, or you can speed up the process by refrigerating the cupcakes for 10-15 minutes.
Cooking Tips and Variations
- Make Ahead: The cupcakes can be baked a day in advance and stored in an airtight container at room temperature. The custard filling can also be made a day in advance and stored in the refrigerator. The ganache is best made fresh, but it can be stored in the refrigerator for a day or two and gently reheated before using.
- Even Cupcakes: Use an ice cream scoop to ensure each cupcake liner has the same amount of batter. This will help them bake evenly.
- Preventing Curdling: Use low heat and constant stirring when making the custard to prevent the egg yolks from curdling.
- Smooth Ganache: Use good quality chocolate and chop it finely for even melting to ensure a smooth, glossy ganache.
- Cooling: Allow the cupcakes and custard to cool completely before assembling to prevent the ganache from melting and the cupcakes from becoming soggy.
- Piping Bag: Filling the cupcakes with a piping bag will ensure a more even and neat distribution of custard.
- Extract Variations: Experiment with different extracts in the cupcake batter or custard filling. Almond extract, lemon extract, or even a hint of rum extract can add a unique flavor dimension.
- Espresso Ganache: Add a teaspoon of espresso powder to the hot cream before pouring it over the chocolate for a mocha-flavored ganache.
- Chocolate Chips: Fold chocolate chips into the cupcake batter for added chocolate flavor.
- Liqueur Infusion: Brush the cooled cupcakes with a small amount of rum or coffee liqueur before filling them with custard for an extra layer of flavor.
Storage and Reheating
Store leftover Boston Cream Pie Cupcakes in an airtight container in the refrigerator for up to 3 days. The cupcakes are best enjoyed cold or at room temperature. Reheating is not recommended, as it can cause the custard filling to melt and the ganache to become messy. If you prefer a slightly softer cupcake, you can let them sit at room temperature for about 30 minutes before serving.
Frequently Asked Questions
Why is it called Boston Cream Pie when it’s a cake?
That’s a great question! Back in the mid-19th century, the terms “cake” and “pie” were used more interchangeably than they are today. The Boston Cream Pie was created at a time when cake pans and pie pans were often the same size and shape, and the term “pie” was sometimes used to refer to any dessert filled with cream or custard.
Can I use store-bought custard instead of making my own?
While homemade custard is highly recommended for its superior flavor and texture, you can certainly use store-bought custard in a pinch. Just be sure to choose a high-quality custard that is thick and creamy. You may also want to add a touch of vanilla extract to enhance the flavor.
My ganache is too thick/thin. What can I do?
If your ganache is too thick, add a tablespoon of warm heavy cream at a time, stirring until you reach the desired consistency. If your ganache is too thin, refrigerate it for a few minutes to allow it to thicken. Be careful not to over-refrigerate, as it can become too hard.
Can I freeze these cupcakes?
Freezing is not recommended, as the custard filling can become watery upon thawing, and the ganache may lose its shine. The cupcakes are best enjoyed fresh or within a few days of making them.