The Quintessential Apple Pie: A Step-by-Step Guide to Baking Perfection
I. Introduction: The Allure of Apple Pie
Imagine the scent wafting from your kitchen: warm, sweet apples mingling with cinnamon, enveloped in a buttery, golden crust. The gentle bubbling of the filling, hinting at the tender fruit within, promises a slice of pure comfort. This is the magic of apple pie – a dessert that transcends mere sweetness to become a sensory experience, evoking memories of home, holidays, and simpler times. It’s a dish that warms the soul as much as it delights the palate, a true culinary embrace.
While often celebrated as an “all-American” classic, apple pie’s roots actually stretch back to medieval England, where it was more savory than sweet. Over centuries, it evolved, crossed oceans, and became the beloved dessert we know today, a symbol of hospitality and tradition. Its enduring popularity lies in its perfect balance of textures and flavors: the crisp, flaky pastry giving way to a soft, spiced fruit filling. A homemade apple pie, though it asks for a little time and love, offers an incomparably superior experience to any store-bought version.
In this comprehensive guide, we promise to equip you with everything you need to bake the ultimate apple pie. Whether you’re a novice baker embarking on your first pie adventure or a seasoned pro seeking a foolproof recipe and refined techniques, you’ll discover the secrets to a perfectly flaky crust, a vibrantly flavored filling, and a pie that will earn you rave reviews. Get ready to transform simple ingredients into a masterpiece of comfort food.
II. The Foundation: Mastering the Pie Crust
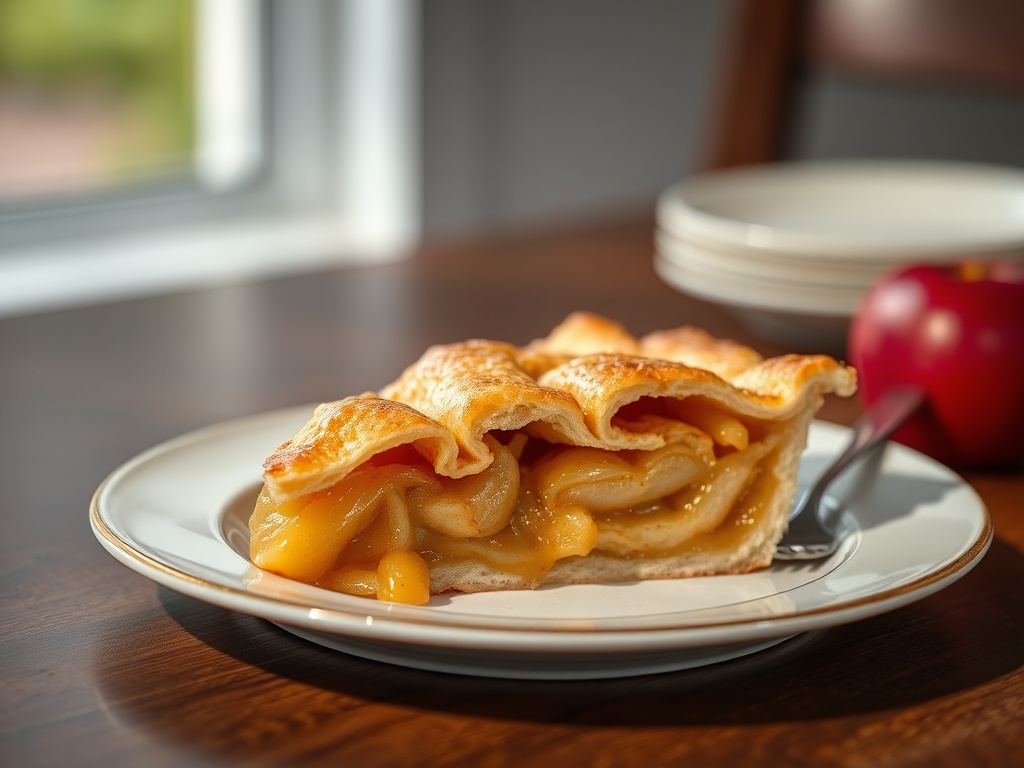
The crust is the unsung hero of any pie, and in apple pie, it plays an absolutely crucial role. A truly great crust is flaky, tender, and rich with buttery flavor, providing the perfect counterpoint to the sweet-tart filling. It’s more than just a container; it’s an integral part of the pie’s overall texture and taste experience. Achieving this perfection relies on a few key ingredients and techniques.
Our recipe calls for a simple yet effective combination: all-purpose flour, very cold unsalted butter (or a blend with shortening/lard for extra flakiness), a pinch of salt for flavor, and ice-cold water. The secret to that coveted flaky texture lies in keeping all your ingredients, especially the butter and water, as cold as possible. When cold fat pieces are incorporated into the flour and then baked, the water in the butter turns to steam, creating tiny pockets that separate the layers of dough, resulting in an incredibly airy and tender crust. Minimal handling is also paramount; overworking the dough develops gluten, which leads to a tough, rather than tender, crust.
After mixing, resting the dough in the refrigerator is a non-negotiable step. This allows the gluten to relax, making the dough easier to roll out and preventing shrinkage during baking. For those aiming to prevent a “soggy bottom,” a brief blind bake of the bottom crust can be a game-changer, especially with very juicy apple fillings. This process partially bakes the crust before the filling is added, creating a barrier against moisture and ensuring a crisp base every time.
III. The Heart of the Pie: The Apple Filling
While the crust provides the stage, the apple filling is truly the star of the show. And the success of your filling hinges almost entirely on one critical decision: choosing the right apples. Not all apples are created equal when it comes to baking; some will turn to mush, while others will hold their shape, providing that delightful textural contrast we crave in a pie.
For the best apple pie, a blend of varieties is often ideal. We recommend a mix of tart and firm apples like Granny Smith (known for its crispness and bright acidity) with sweeter, slightly softer but still firm varieties such as Honeycrisp, Braeburn, Jonagold, or Fuji. Golden Delicious can also be a good addition for its softer texture, integrating well with the firmer apples. This combination ensures a complex flavor profile – a perfect balance of sweet and tart – and a varied texture that prevents the filling from becoming monotonous.
Beyond the apples, the flavoring and thickening agents are key. Classic spices like cinnamon and a hint of nutmeg are essential, with optional additions of allspice or cloves for deeper warmth. For sweetness, a mix of granulated sugar and brown sugar adds both sweetness and a molasses-rich depth of flavor. To prevent a watery filling, a thickener is crucial. Cornstarch provides a glossy, clear finish, while flour offers a more opaque, traditional look. Tapioca starch is an excellent choice for fruit pies, as it thickens beautifully without becoming cloudy and holds up well to acidic fruits. We also recommend macerating the sliced apples with sugar, spices, and a splash of lemon juice (to brighten the flavor and prevent browning) for 30 minutes to an hour. This draws out excess liquid, which can then be reduced and added back, concentrating the apple flavor and ensuring a perfectly set filling.
IV. Assembly & Baking: Bringing it All Together
With your perfect crust and flavorful filling ready, the moment of assembly arrives. This is where patience and a gentle hand are your best friends, transforming individual components into a cohesive, beautiful pie. When rolling out your dough, ensure an even thickness to promote uniform baking. A lightly floured surface and a confident roll will prevent sticking and tearing. Remember, the dough should still be cool, so if it starts to become too pliable, pop it back into the fridge for a few minutes.
Once the bottom crust is settled into your pie plate, it’s time for the filling. Don’t be shy here – mound the apples high in the center. They will cook down considerably during baking, and a generous mound ensures a full, satisfying pie. Distribute the apples evenly to avoid large air pockets. For the top crust, you have options: a classic full top (remembering to cut vents for steam to escape), a beautiful lattice design for aesthetic appeal and even steam release, or a crumbly streusel topping for added texture. Whatever your choice, ensure the edges are securely sealed and crimped to contain the precious filling.
A final touch, an egg wash (beaten egg with a splash of water or milk) brushed over the top crust, will give your pie a gorgeous golden sheen, and a sprinkle of coarse sugar adds sparkle and a delightful crunch. Baking begins with an initial blast of high heat to set the crust quickly and create lift, followed by a lower temperature to allow the apples to tenderize gently without burning the crust. The key is to bake until the filling is actively bubbling in the center, not just around the edges – this indicates the apples are tender and the thickener has done its job. If the edges of your crust start to brown too quickly, a simple foil tent will protect them. Finally, and perhaps most importantly, resist the urge to cut into your masterpiece immediately. A cooling period of at least 2-4 hours, ideally longer, is absolutely crucial for the filling to properly set, ensuring clean slices and preventing a runny mess. Patience here is truly a virtue.
V. Recipe Card
Yield: 8 servings
Prep Time: 45 minutes
Cook Time: 50-60 minutes
Cooling Time: 2-4 hours
Equipment:
- 9-inch pie plate
- Rolling pin
- Large mixing bowls
- Parchment paper or plastic wrap
- Pastry blender or food processor (optional)
- Sharp knife or apple peeler/corer
Ingredients:
- For the Flaky Pie Crust (double batch):
- 2 ½ cups (300g) all-purpose flour, plus more for dusting
- 1 teaspoon salt
- 1 cup (226g) unsalted butter, very cold and cut into ½-inch cubes (or frozen and grated)
- ½ cup (120ml) ice water, plus 1-2 tablespoons more if needed
- For the Apple Filling:
- 6-7 medium baking apples (about 3 lbs total), a mix of Granny Smith and Honeycrisp/Fuji/Braeburn, peeled, cored, and sliced ¼-inch thick
- ½ cup (100g) granulated sugar
- ¼ cup (50g) packed light brown sugar
- 1 ½ teaspoons ground cinnamon
- ¼ teaspoon ground nutmeg
- ⅛ teaspoon ground allspice (optional)
- 1 tablespoon fresh lemon juice
- 2 tablespoons all-purpose flour OR 1 ½ tablespoons cornstarch OR 2 tablespoons tapioca starch
- 1 tablespoon unsalted butter, cut into small pieces
- For the Egg Wash:
- 1 large egg, beaten
- 1 tablespoon milk or water
- 1 tablespoon coarse sugar (for sprinkling, optional)
Instructions:
- Make the Pie Crust: In a large mixing bowl, whisk together the flour and salt. Add the very cold butter cubes. Using a pastry blender, your fingertips, or a food processor (pulse just a few times), cut the butter into the flour until the mixture resembles coarse meal with some pea-sized pieces of butter remaining.
- Gradually add the ice water, 1 tablespoon at a time, mixing gently with a fork until the dough just comes together. Do not overmix. If the dough is too dry, add another tablespoon of water. Divide the dough into two equal discs, flatten slightly, wrap tightly in plastic wrap, and refrigerate for at least 1 hour (or up to 2 days).
- Prepare the Apple Filling: In a very large bowl, combine the sliced apples, granulated sugar, brown sugar, cinnamon, nutmeg, allspice (if using), and lemon juice. Toss gently to coat. Let the mixture sit for at least 30 minutes, or up to an hour, allowing the apples to release some of their juices.
- After macerating, drain any accumulated liquid from the apples into a small saucepan. Bring the liquid to a boil over medium-high heat and reduce it by about half, until slightly syrupy (about 5-7 minutes). Let cool slightly.
- Add the flour, cornstarch, or tapioca starch to the apples and toss to coat evenly. Pour the reduced apple liquid back over the apples and toss again.
- Assemble the Pie: Preheat your oven to 425°F (220°C). On a lightly floured surface, roll out one disc of chilled pie dough into a 12-inch circle. Carefully transfer the dough to your 9-inch pie plate. Trim the edges, leaving about a ½-inch overhang.
- Pour the apple filling into the pie crust, mounding the apples high in the center. Dot the top of the apples with the small pieces of butter.
- Roll out the second disc of dough. You can either place it directly over the filling (cutting several slits for steam vents) or cut it into strips to create a lattice top.
- Carefully place the top crust over the filling. Trim any excess dough, then fold the top crust overhang under the bottom crust overhang. Crimp the edges together using your fingers or a fork to seal.
- In a small bowl, whisk the egg with milk or water for the egg wash. Brush the top crust evenly with the egg wash and sprinkle with coarse sugar, if desired.
- Bake the Pie: Place the pie on a baking sheet (to catch any drips). Bake at 425°F (220°C) for 15 minutes.
- Reduce the oven temperature to 375°F (190°C) and continue to bake for another 35-45 minutes, or until the crust is deeply golden brown and the filling is visibly bubbling through the vents. If the crust edges start to brown too quickly, loosely tent the pie with aluminum foil.
- Cool and Serve: Once baked, transfer the pie to a wire rack and let it cool completely for at least 2-4 hours before slicing and serving. This is crucial for the filling to set properly.
- Serve warm, perhaps with a scoop of vanilla ice cream or a dollop of whipped cream.
VI. Cooking Tips and Variations
Achieving pie perfection comes with a few tricks up your sleeve. Remember that cold is key for your pie crust; don’t be afraid to chill your butter, flour, and even your bowl before starting. If your dough becomes too warm while rolling, simply return it to the refrigerator for 10-15 minutes. For a truly flaky crust, handle the dough as little as possible to avoid developing tough gluten. When preparing your apples, a mix of varieties provides the best balance of flavor and texture – combine tart, firm apples like Granny Smith with sweeter, slightly softer ones. Don’t skip the macerating step for the apples; it helps draw out excess moisture, preventing a watery filling, and concentrates the apple flavor. When baking, ensure the filling is visibly bubbling in the center, not just the edges, to guarantee the apples are tender and the thickener is fully activated. If your crust edges are browning too quickly, a simple foil tent will save them. For variations, consider adding a tablespoon of brandy or bourbon to the apple filling for a sophisticated kick, or experiment with different spice blends like cardamom or ginger. For a twist on the classic, try a streusel topping instead of a full top crust, made with oats, brown sugar, flour, and butter for an added crunchy texture.
VII. Storage and Reheating
A freshly baked apple pie is best enjoyed the day it’s made, but leftovers can be stored. At room temperature, covered loosely, a pie will stay fresh for about 1-2 days. For longer storage, cover it tightly with plastic wrap or aluminum foil and refrigerate for up to 3-4 days. The crust may soften slightly in the refrigerator. To reheat, place individual slices in a microwave for 30-60 seconds, or warm larger portions in an oven preheated to 300°F (150°C) for 15-20 minutes, or until gently warmed through. This helps crisp up the crust again. You can also freeze a baked apple pie: cool it completely, then wrap it tightly in several layers of plastic wrap and then foil. It can be frozen for up to 3 months. Thaw overnight in the refrigerator, then reheat in the oven as described above.
VIII. Frequently Asked Questions
What kind of apples are best for apple pie?
The best apple pies use a blend of apple varieties. Aim for a mix of tart, firm apples like Granny Smith (for flavor and structure) and sweeter, slightly softer but still firm apples such as Honeycrisp, Braeburn, Fuji, or Jonagold. This combination ensures a balanced flavor and varied texture, preventing the pie from becoming too sweet or too mushy.
Why is my apple pie filling so runny?
A runny apple pie filling is often due to one or a combination of factors: not enough thickener (flour, cornstarch, or tapioca starch), not baking the pie long enough for the thickener to activate, or slicing into the pie before it has had sufficient time to cool and set. Allowing the pie to cool for at least 2-4 hours is crucial for the juices to gel and solidify.
How do I prevent a soggy bottom crust?
To prevent a soggy bottom, ensure your pie crust is made with very cold butter and minimal handling. You can also lightly blind bake the bottom crust before adding the filling, which creates a barrier against moisture. Additionally, macerating the apples to draw out excess liquid and then reducing that liquid before adding it back to the filling helps manage the moisture content.
Can I make the pie dough ahead of time?
Absolutely! Pie dough is an excellent component to prepare in advance. You can make the dough, form it into discs, wrap it tightly, and refrigerate it for up to 2-3 days. For longer storage, you can freeze the dough for up to 3 months. Thaw it in the refrigerator overnight before rolling and assembling your pie.