Introduction
There’s something undeniably magical about a square of rich, creamy fudge. It evokes childhood memories, holiday gatherings, and the simple pleasure of a decadent treat. But for many, homemade fudge feels like a daunting task, fraught with candy thermometers, precise temperatures, and the ever-present threat of a grainy, crumbly mess. What if we told you that you could achieve that same melt-in-your-mouth perfection with minimal effort and just a handful of ingredients? Welcome to the wonderful world of easy fudge, a game-changer for anyone who craves homemade sweetness without the culinary acrobatics.
This isn’t just any fudge recipe; it’s designed to be foolproof, making it perfect for beginners and seasoned bakers alike. The secret lies in a clever combination of ingredients that eliminates the need for a candy thermometer, allowing you to create beautiful, smooth fudge every single time. Imagine whipping up a batch of rich chocolate goodness in under 20 minutes of active prep time, then simply letting it cool to perfection. It’s the ultimate no-bake dessert that delivers impressive results with astonishing simplicity, making it an ideal candidate for last-minute cravings, homemade gifts, or a quick addition to any dessert spread.
So, whether you’re looking to impress guests, satisfy your sweet tooth, or create heartwarming edible gifts for the holidays, this easy fudge recipe is your new best friend. We’ll guide you through every step, offering tips for perfection and endless ideas for customization. Get ready to embrace the joy of homemade fudge—we guarantee you can do this!
Nutritional Information
Per serving (approximate values for 1/24th of an 8×8 inch pan):
- Calories: 220
- Protein: 3g
- Carbohydrates: 28g
- Fat: 12g
- Fiber: 1g
- Sodium: 65mg
Ingredients
- 1 (14-ounce) can sweetened condensed milk
- 2 cups (about 12 ounces) semi-sweet chocolate chips (or milk chocolate, dark chocolate)
- 2 tablespoons unsalted butter
- 1 teaspoon pure vanilla extract
- Optional: 1/2 cup chopped nuts, mini marshmallows, or other desired add-ins
Instructions
- Line an 8×8 or 9×9 inch baking pan with parchment paper or aluminum foil, leaving an overhang on the sides to easily lift the fudge out later. Lightly grease the parchment/foil if desired, though it’s often not necessary with the overhang.
- In a large, microwave-safe bowl, combine the sweetened condensed milk, chocolate chips, and butter.
- Heat the mixture in the microwave on high for 1 minute. Remove and stir well with a spatula or wooden spoon.
- Return to the microwave and heat for another 1 minute. Stir vigorously until the chocolate chips and butter are completely melted and the mixture is smooth and glossy. If there are still a few unmelted chips, microwave in 30-second intervals, stirring thoroughly after each, until fully smooth. Alternatively, for a stovetop method, combine ingredients in a heavy-bottomed saucepan over low heat, stirring constantly until melted and smooth. Do not boil.
- Remove the bowl from the microwave (or heat from the stovetop). Stir in the vanilla extract until fully incorporated.
- If using any optional add-ins like nuts or mini marshmallows, fold them into the fudge mixture at this stage.
- Pour the fudge mixture into the prepared baking pan. Use the spatula to spread it evenly into all corners and smooth the top.
- Allow the fudge to cool at room temperature for at least 30 minutes, then transfer it to the refrigerator to chill for a minimum of 2-3 hours, or until completely firm. For best results, chill overnight.
- Once the fudge is fully set, use the parchment paper or foil overhang to lift the fudge out of the pan onto a cutting board.
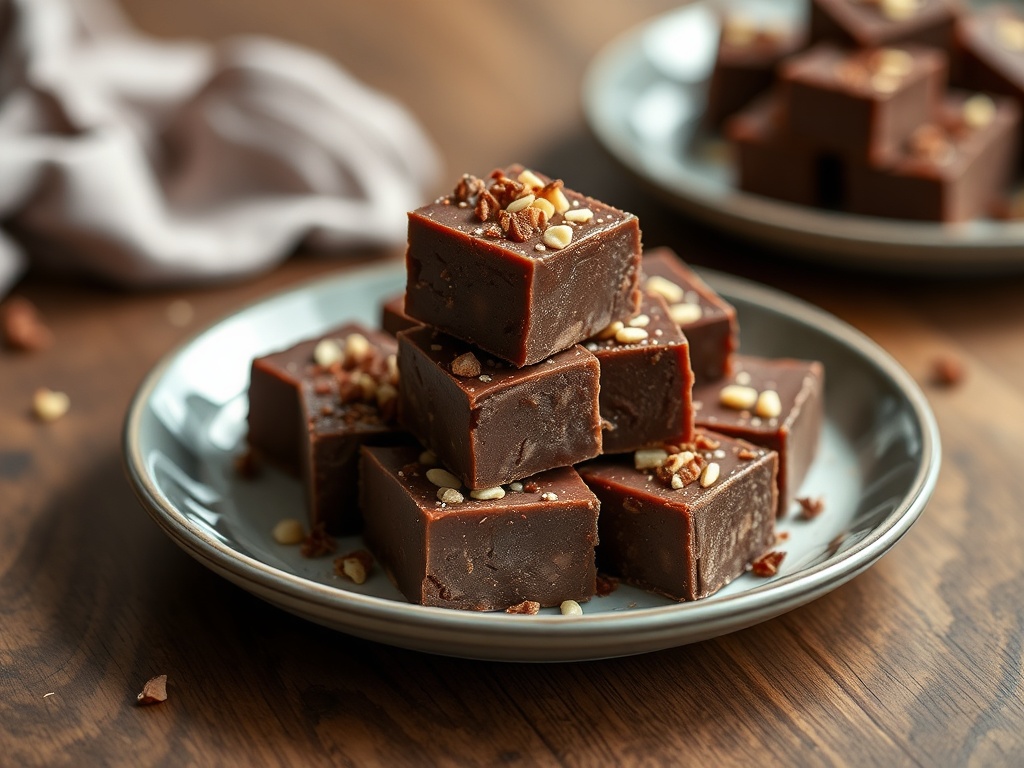
- Using a sharp knife, cut the fudge into 1-inch squares. For cleaner cuts, warm the knife with hot water and wipe it dry between each cut.
Cooking Tips and Variations
Achieving that perfect, smooth, and creamy texture is surprisingly simple with this recipe, but a few key tips can elevate your easy fudge from good to absolutely divine. First and foremost, resist the urge to overcook or overheat your chocolate mixture. Excessive heat can cause the chocolate to seize or the sugar in the condensed milk to crystallize, resulting in a grainy texture. Stirring thoroughly and patiently during the melting process is crucial to ensure all ingredients are fully incorporated and smooth. Always opt for good quality chocolate chips and pure vanilla extract; the flavor difference is noticeable in such a simple recipe. And perhaps the most important tip of all: patience during the cooling process. Don’t rush it! Allowing the fudge to set completely in the refrigerator is essential for clean, firm squares that hold their shape and melt beautifully in your mouth.
Troubleshooting common issues can save your fudge from disaster. If your fudge turns out grainy, it’s likely due to overheating. You can sometimes salvage it by gently re-melting it over very low heat with a tiny bit more condensed milk or butter, stirring constantly until smooth again. If your fudge won’t set, it might be due to not enough chocolate or improper mixing. Re-melting and adding a bit more chocolate can often fix this. If it’s too hard, it was probably overcooked; storing it at room temperature might soften it slightly over time. For perfectly cut squares, always line your pan with parchment paper for easy removal. Use a sharp knife, warm it under hot water, and wipe it clean between each cut for those pristine edges.
The beauty of this easy fudge recipe lies in its incredible versatility. You can easily swap out the chocolate base to create different flavor profiles. Try milk chocolate for a sweeter, classic taste, dark chocolate for a more intense, sophisticated treat, or even white chocolate for a creamy, vanilla-forward base. For peanut butter lovers, consider using peanut butter chips instead of chocolate chips, or stir in a few tablespoons of creamy peanut butter with your chocolate mixture. The possibilities for extracts are endless: peppermint for a festive touch, almond for a nutty aroma, orange for a bright citrus note, or coffee for a deeper, richer flavor.
Add-ins are where you can truly let your creativity shine. Nuts like walnuts, pecans, almonds, or peanuts add a delightful crunch; try toasting them lightly for enhanced flavor. Candies and mix-ins transform your fudge into a personalized confection: mini marshmallows for a rocky road variation, crushed Oreos or graham crackers for a cookies-and-cream twist, colorful sprinkles for a festive look, or toffee bits for a buttery crunch. Swirls of caramel or dried fruits like cranberries or cherries also make fantastic additions. Don’t forget toppings and garnishes! A sprinkle of flaky sea salt elevates the chocolate flavor, a drizzle of contrasting chocolate, or a dusting of powdered sugar can add visual appeal and extra taste dimensions.
Storage and Reheating
Proper storage is key to maintaining the freshness, texture, and flavor of your homemade easy fudge. Once your fudge has fully set and been cut into squares, transfer it to an airtight container. At room temperature, in a cool, dry place, your fudge will remain delicious for up to 3-5 days. This is often when the texture is at its absolute best – perfectly soft, creamy, and melt-in-your-mouth. For longer storage, the refrigerator is your friend. Stored in an airtight container in the fridge, your fudge will last for 2-3 weeks. If you’re stacking layers of fudge, it’s a good idea to place a piece of parchment paper between the layers to prevent them from sticking together. While refrigeration can sometimes make fudge a little firmer, allowing it to sit at room temperature for 10-15 minutes before serving will bring it back to its ideal texture.
Fudge also freezes beautifully, making it an excellent candidate for meal prep or for having a stash of treats ready for unexpected guests. To freeze, wrap individual pieces or small stacks of fudge tightly in plastic wrap, then place them in an airtight freezer-safe container or freezer bag. Frozen fudge can last for up to 3 months. When you’re ready to enjoy it, simply transfer the desired amount of fudge from the freezer to the refrigerator overnight, or let it thaw at room temperature for a few hours. Avoid thawing in the microwave, as it can alter the texture. Freezing is particularly useful for holiday baking or for making large batches for gifting.
Speaking of gifting, homemade fudge is a universally loved present. Package your delicious creations in cute decorative boxes or tins, tied with a festive ribbon and a personalized tag. It’s a thoughtful and delicious hostess gift, a perfect addition to holiday cookie platters, or a much-appreciated treat for teachers and neighbors. Fudge is quite rich, so packaging it in smaller portions is often a good idea. Serve your fudge alongside a hot cup of coffee or tea, as part of a dessert platter, or even crumbled over a scoop of vanilla ice cream for an extra-indulgent treat.
Frequently Asked Questions
Why is my fudge grainy?
Grainy fudge is most often caused by overheating the mixture or not stirring it thoroughly enough. When the sugar in the condensed milk crystallizes due to too much heat or insufficient stirring, it results in a gritty texture. To avoid this, melt the ingredients slowly and stir constantly until completely smooth. If your fudge is already grainy, you can sometimes fix it by gently re-melting it over very low heat with a tiny bit more condensed milk or butter, stirring continuously until it becomes smooth again before re-setting.
My fudge won’t set, what went wrong?
If your fudge isn’t setting, it could be due to a few reasons: not enough chocolate, too much liquid (though less common with this specific recipe as it’s balanced), or ingredients not being properly mixed. Ensure you’re using the correct amount of chocolate chips as specified in the recipe. If it’s still warm and seems too soft, you can try re-melting the mixture, adding another 1/4 to 1/2 cup of chocolate chips, and then re-chilling. Make sure it chills for the full recommended time, preferably overnight, as patience is key for proper setting.
Can I make this fudge without a microwave?
Absolutely! If you don’t have a microwave or prefer not to use one, you can easily make this fudge on the stovetop. Combine the sweetened condensed milk, chocolate chips, and butter in a heavy-bottomed saucepan. Heat over very low heat, stirring constantly with a spatula or wooden spoon, until the chocolate chips and butter are completely melted and the mixture is smooth and glossy. Be careful not to let the mixture boil or scorch. Once smooth, remove from heat and stir in the vanilla extract, then proceed with the rest of the instructions.